
Tracing Maus
Assignment Details
- Due: March 8
- Format: Published to your site as a series of interlinked pages, plus a reflective post (more about this structure below)
- Audience: You should assume an audience that has read Maus and thought about it a little bit, but who understands the books not quite as well as you do.
- The style of your written reflection should be “academic casual.” I expect clear, coherent, grammatically correct prose.
- You are not required to use any outside sources for this assignment; however you are allowed to use any of the analytical texts from the class or any outside analyses of Maus as you write your reflections. Make certain that you cite any sources (and link to any texts that are online).
This assignment is an exercise in close reading and explication (see Understanding Rhetoric page 81 and following for more on explication), in which you will look very carefully and precisely at 2 pages of your choice from Maus, making notes about what you observe, and then you’ll present what you uncover in the process and draw some connections between what you see in those pages and the larger narrative.
You’ll be writing web pages, not making a video, but an exceptionally well-done model to look to for the type of analysis this assignment asks for can be found in the Nerdwriter video essay that we discussed earlier this semester:
Choosing pages
You will trace two different pages for this project on tracing paper that I’ll distribute in class. A “page” means a single verso or recto page. You may do a two-page spread, but only if that spread forms a coherent unit, in which case a two-page spread will count as one “page” (and that will make this assignment more difficult for you, so consider carefully before you take it on).
Caveats:
- Your two pages should feel distinctly different from each other.
- My preference is that you choose one page from Book 1 and another page from Book 2; however you may make a case to me to choose two pages from the same book if you have a specific reason to do so. Come talk to me and present your reason for doing so.
The only criterion other than the two caveats above is that you should find the pages compelling. Remember earlier in the semester when I asked you to choose a single panel that was the “most important” from our reading that day and said that part of what you would need to do is to explain, while writing about it at the start of class, what you mean by “important”? This process should be similar — a page might be compelling to you because of one particular moment on it that really stands out or because of something odd or confusing or quirky that you want to spend more time thinking about. You might find yourself thinking about a larger theme of the text that you know you ultimately want to address and then looking for for pages that will allow you to do so. Or you might find yourself thinking about interesting pages that somehow surprised or captivated you and choosing those pages without knowing ultimately exactly what themes they will lead you to address. Either approach is potentially fruitful.
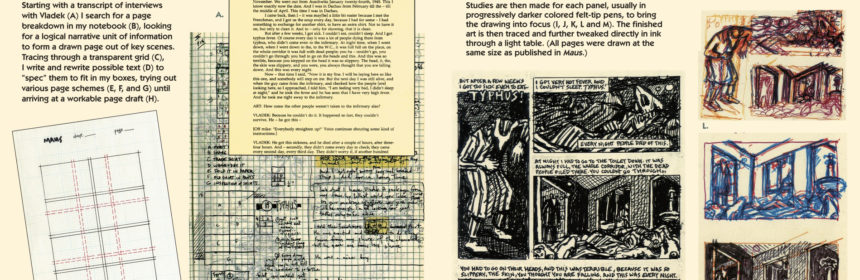
Tracing Pages
(I recommend that you take notes for the analysis described later, instead of waiting until you’ve finished tracing. You will probably discover much during the actual process of tracing that you’ll want to talk about for the reflection.)
First Tracing
- Pick a compelling page from Maus and trace it. Your goal is not to create a look-alike reproduction of the original page but rather to distill the original page into a simplified line drawing. If there are caption bubbles or boxes, you should trace their outline, but please do not copy the text within.
- Once you have finished tracing, scan it digitally and save the file as an image (jpg or png). Use an actual scanner (the best scanners for this purpose are located in the Media Lab space on the 4th floor of the library) not a simple cell phone photo.
- Either print out the scanned image or make a photocopy of your trace page, so that you can draft the next step without worrying about destroying your first trace image.
- Annotate the printout or photocopy of the traced page with “gutter text”—your own text, written into the gutters, margins, and empty captions of the pages (see instructions for annotating below).
- When you are satisfied with the annotation on the traced page, scan that page and save the digital image at a high resolution (again, use an actual scanner).
Second Tracing
- For the second tracing select a page that feels distinctly different from the page you traced earlier — maybe there’s something different about the overall layout, or the artistic style, or the tone of the page. In any case, select a page that provides visual tension with your first tracing.
- As in the first tracing, distill the original page into a simplified line drawing.
- After you have traced this page, repeat the rest of the steps above, this time annotating with an eye toward what makes this page different from your first selection.
Annotating the traced pages
Think of your gutter text as a dissection of the page, in which you highlight both the salient and the subtle characteristics of the page’s panels.

Detail from Making Comics by Scott McCloud showing the kinds of choices writers make when communicating through comics.
As you annotate the page, focus on recognizing the choices Spiegelmann makes with regard to Scott McCloud’s framework of writing with clarity: choices of moment, frame, image, and flow (don’t worry about word just yet).
In this process, you might find yourself noticing the various formal features of the drawing: color, saturation, shading, line styles, shapes and sizes, angles and placement, perspective and framing, layering and blocking. Or considering the relationship between the elements on the page: the transitions between panels, the interplay between words and images, the way time and motion are conveyed.
Remember, as Nerdwriter argues in the video embedded above, that the unit of communication for comics is the page, moreso than the panel. Pay attention to the overall layout of the page: the use of gutters and margins, the arrangement of panels, the flow of narrative or imagery. How do all the various panels on the page work together to create a clear and coherent unit? What do you notice when you look at the page as a unit?
You might not be able to fit all your notes actually on the page, in which case you can either write them on additional pages or type them up and add them onto the page when you upload your traced images. If you need additional space to include your notations like this, you should probably number them and add reference numbers on your traced image so your notes can point to specific spots on the page.
Once you have completed your annotations, publish 2 pages on your site, one for each annotated tracing page. Include a large version of your scanned traced page (or a smaller size image that links to the full sized image) and any additional notes.
Analyze your tracings
Now that you’ve spent some sustained time and effort looking very closely at these two pages, take a step back and go through your notes, think about what you have seen, and identify any patterns that come to your attention.
Questions to consider
There are many ways to approach this analysis, but one promising point of departure is to explain what drew you to the two pages you traced. Explain decisions you made while tracing: What did you find yourself leaving out of the tracing? What did you find yourself striving to include in the tracing? Why? What did the act of tracing reveal about the page? What did the product of your tracing reveal? Is there a difference between the two?
Think about how these two pages you’ve focused on fit into the work as a whole. How closely does your tracing capture the dominant narrative or visual themes of the overall work?
Synthesis
After thinking carefully about the tracings and your annotations, decide on three ideas, patterns, or points of connection that are the most interesting. Each of those ideas should become its own page (each about 250 words) as part of this project.
- Each of these pages should make an arguable claim about something you have observes in your two traces pages.
- Each of these pages should address both of the two tracings that you made (so definitely do not write 250 words about the first traced page, then another 250 words about the second traced page, then 250 words about something else). Draw contrasts and/or comparisons across your two traced pages in each part of your project.
- Each of your pages should include, along with the 250 words of text, one or more images. Each of your traced pages will have their own place in the project (see Publishing below), so do not include a scan of your entire page as an image here.
- You might crop your traced page to include specific details that you’re describing in the text.
- You might scan particular panels of Maus itself and put those panels into conversation with your traced pages — this might take the form of showing the panel(s) both as you have traced them and on the page, or it might take the form of showing panel(s) from a page that you did not trace that connects to your argument in some way, or you might find some other use for such scans.
- You might also find or create other images that somehow help you to make your own argument. Maybe it helps you to show an actual map of Poland against the backdrop of Spiegelman’s drawn map. Or maybe a few frames from another comic, like Rosalie Lightning or Nancy, would somehow help you to further your argument. Or maybe the Mona Lisa would be useful for you for some reason?
- Look for places to make connections between the three pages. Create hyperlinks between the pages at those connecting points.
Landing Page
After you have created these three pages, create the landing page. It should have a compelling visual image of some sort, and one paragraph of text pulls together the three patterns you identified, even if it’s something of a loose connection between them. The idea here is to provide at least a gesture towards synthesizing the patterns and that serves as something of an overview of/introduction to your project as a whole.
Publishing
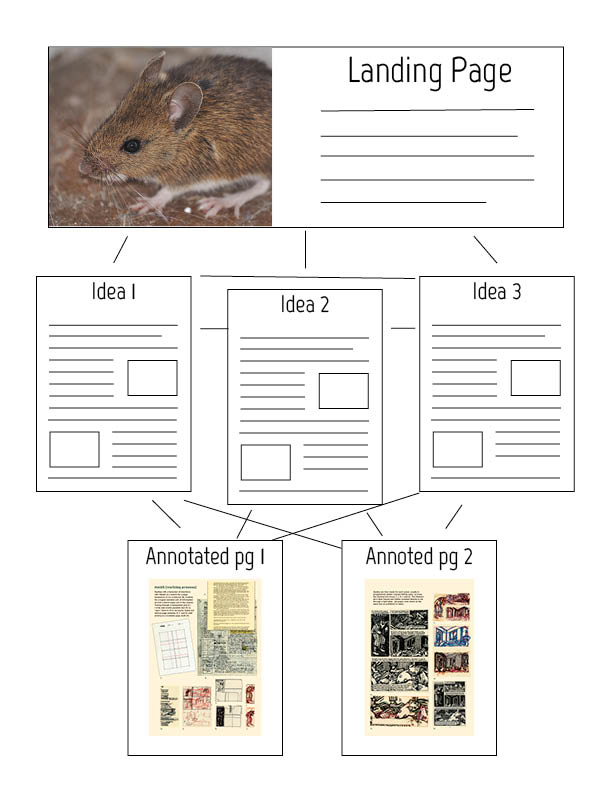
Diagram of the pages for this project
When all is said and done, the Maus project will be published to your site as 6 pages plus one blog post:
- A landing page, with a compelling visual of some sort and one paragraph that lays out your project and links to the three pages of your analysis.
- One page for each of the three significant ideas you are explaining in this project.
- One page for each the scanned images of your two annotated traced pages, plus any additional notes.
- Once all the pages are published, a blog post that links to your landing page and reflects on your own writing process.
Pingback: Week Ahead: 8 – Visual Writing and Thinking
Pingback: Tracing Maus Reflection – Visual Writing and Thinking